As promised, here are some pics of some pieces of furniture that I`ve upcycled (this word really intrigues me!) I`ve only posted a few, but will maybe get round to showing more at a later date.
 I used Annie Sloan chalk paint.
http://www.anniesloan.com/
(found this image at
http://lavieenrose.ie/paint/ )
I`ve done quite a few pieces with other paints, including eggshell Farrow and Ball, but this paint goes further, and cleaning the brushes is just a matter of rinsing with water under the tap. If you use the brushes to apply her wax, which is more effective than using a rag (I use a rag to get rid of excess wax, and to buff the furniture the next day,) then you need to wash that brush with washing-up liquid and water, but it`s better than messing around with solvents. (My hands and their dermatitis appreciate it!)
Of course, the real bonus for most people is the time factor. This paint dries fast, if you live in a hot climate (unfortunately, I now don`t), then maybe too fast? But it means you can have a small piece done in a day, and a larger in a couple. Higher humidity will mean slower drying times, and depending on the type of wood you`re working on, and if you need more than one coat. Personally, I always apply more han one coat with this paint, even if they say you don`t always need to. And the wax is what really makes the finish. Not only does it obviously protect your furniture, but it gives it that professional look. The only down side, for me anyway, is that while it sands so easily because it is chalk-based, it creates quite a mess. Apparently Annie Sloan recommends sanding after waxing, for the same reason, but that doesn`t work for me. Each to their own. Let me know if you`ve used this paint and what you think of it....
Before...
and after!
The Queen Anne style? legs gave this little coffee table immediate potential, and for 10 pounds in a local charity shop, it was an absolute bargain! The painting was the easy bit- eventually, I had to take off the horrible imitation leather (lots of pulling, scraping, soaking with water and scraping some more), to make the decopatch (découpage sounds much nicer) easier. But I think I should have used a thinner paper - these are craft papers I bought in Dunelm. I sealed with ModPodge, which I used to stick the paper down and then gave it an isolation coat of acrylic medium, before applying a few coats of acrylic varnish, and if I say so myself, I am really chuffed with the end result.
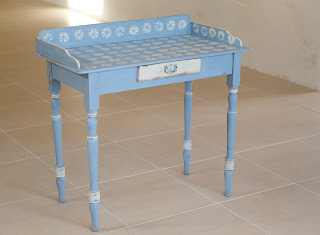
I loved the spindly legs on this little pine table, but it needed treating for woodworm before I transformed it into this. The pattern on the top was done using one of my handmade rubber stamps that I also use in my artwork, to give it a truly unique look. Unfortunately, it`s a little wobbly, even after we reinforced it a bit, but it still does the job and looks pretty.
These had been sitting in my parents`garage for years, neglected and feeling sorry for themselves. If I had taken a "before" picture, you would know what I mean. Thanks to handyman, Jonny Moody, for fixing the door, etc. but it`s a beautiful and useful little piece (stores cups and saucers in the studio), and although I wasn`t 100% sure, in the end I decided to make a statement and do it this red colour, (with an undercoat of louis blue underneath, showing through in places). Although the chair would be gorgeous painted, it just needed a light sanding and a little wax and buffing. Sometimes, no paint is a good thing too.
I have plans to have furniture like this for sale too, just need more hours in the day!
Hopefully, will have a video of the opening night to show soon. ( I still have to give my brother a song to put to it! oops!)


I used these paints to re-vamp a dresser just before Christmas and I love the results! They were so easy to use and give such brilliant results.
ReplyDeletehttp://www.ginaferrari.blogspot.co.uk/2012/12/day-nine.html